A Guide to Q3DM7The main focal point of this map is the red armor room (as shown below). Teams win and lose maps based on how well they attack and defend this particular area of the map. On the map below there are green arrows which represent a defending player and which direction that defending player generally will shoot. You may notice that they generally are not pointing at the door nearest to them, and there is a valid reason for this. In addition to the red armor (the highest protection the map offers), it also has one of the most destructive weapons in all of quake3, and that is the rail. Many teams rely on the rail to defend this room, and given that most players prefer medium to long ranges when using this will stand opposite the door they are covering. What you as a spectator want to watch for is this: 1: How well is the defending players railing? If they can't rail very well, it gives the attackers a few more options. 2: Where are they standing? Are they susceptible to quick hit and run attacks by having someone quickly poke from behind a doorway and fire? 3: How well is their armor management? Is there one real big player, or a couple of medium players? How many are getting "stolen" from them by the opposing team? 4: How well are the attacks/defends going? Are they clean where one side is walking away with weapons and health, or are both sides quickly reduced to the lowest common denominator of a new spawn? 5: How well are teams using the other weapons to secure and attack this room? One crafty player with a rocket launcher can take out 2 railers if the conditions are right. Red Armor Area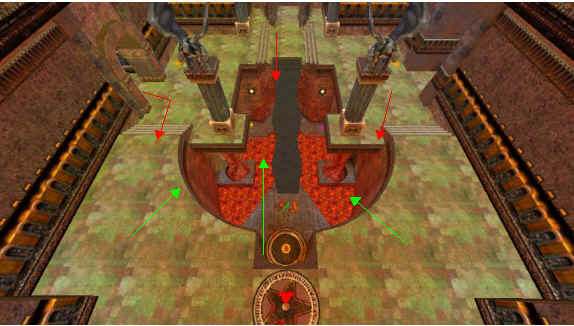
Now comes the one part of the red armor room that all teams love to hate....and that is the general fighting style called "cess". When teams cess, they continually tell their players to keep rushing this particular part of the map until its conquered. Just imagine a mini Braveheart scene, or a civil war movie type of charge....it is winning through numbers. Why does cess'ing work and what does this all mean? In the past (quake1 and 2) when a player would die, they were reduced to the lowest common denominator, they would have no weapon capable of doing serious damage nor any health and armor....one shot from an opposing team usually meant death and thus to repeat the cycle. The way out of the cycle was to avoid contact and rely on your teammates to help you get a decent weapon and armor. Quake3 on the other hand is different in that when a player dies they come back in with a weapon that can do serious damage and extra health to back it up. Now the advantage still lies with the player with better armor and weapon, but its not nearly the advantage it used to be. Once teams figured this out they adapted a new style of play which is to attack an established player (one who has good weapons and armor) with two or more newly spawned players (respawns). A respawn will have by game default 125 health (they cannot be killed in one shot), and one machinegun with 50 bullets. Out of those 50 bullets it is quite common to have 25 percent accuracy and have about 13 bullets hit the intended target. With each bullet doing 5 points of health damage, that is 65 points...not quite enough (you need 100) to kill one player...but put two respawns on one player and you can see it quickly reduces the target into a respawn themselves. Teams will "cess" an area by dying, respawning, attacking until they die again and the cycle just repeats until the area is won over. There is no defense against a team that cess'es, there is only an acceptable attrition rate that both teams are willing to tolerate. For instance, cess'ing against one team may mean in the short run they would lose 2 respawns to every opposing player that has a good weapon. If the attrition rate is low, it will be worth it to gain control of the room, this is why it is very important to pay attention to #4 above. However, if the opposing team has better players or better tactics that attrition rate may jump to 4 or 5 respawns, and pretty soon the cessing team may find itself down by 15 or 20 points early in the game. It all comes down to acceptable losses, how well the defending team is using tactics to be cess resistant and how well the attacking team (the ones doing the cess) are attacking (are they coming in one at a time, or in groups, waiting for one of their players to get a good weapon then cess, etc). Ok, so why all this trouble over one little part of the map? Sure there is armor there and a good weapon but there are other weapons elsewhere on the map....so why fuss over this part? The red armor is thee major key in controlling the all important area next to the red armor, the quad. Teams get the red armor so that every two minutes they can attack the quad powerup area of the map. Powerups are why teams fight, they enable one team to quickly gain points at the expense of their opponents. With a quad powerup, a player's ability to do damage is greatly increased to the point where one shot from almost any weapon is a sure kill. Lets take a look at the quad area next. Quad Area
The green circles depict the defending players and their mostly likely direction that player is responsible for and most likely to be attacked from. Since the quad (light blue icon in the center) is open to all sorts of ways that a player might reach it, it becomes a match to see who can do which better...attack or defend? Some teams opt to attack late (thus maybe having one more armor or weapon to help out), or some teams may opt to defend early (getting into ambush positions). What a spectator needs to watch for is to see if either team is able to get a clean quad run, by "clean" we mean having enough health to take some damage and a weapon (not the machinegun) to which to inflict damage with. A lot of times a player may get quad, but will have sustained so much damage to get it, it will render the player ineffective...this is where the teamwork has to take place to protect the quad runner and get him health and/or weapons. As a general rule, the team that controls the red armor room attacks the quad late, or generally within 5 seconds of it coming up. As they say "timing is everything", and it is so true here also for as a spectator it is interesting to see which team has the exact (to the second) timing of the quad. Good timing ensures that a team increases their chances of staying alive by reducing the time in the hot zone (the small area around the quad, the stairs and the ledge primarily). The team that does not control the red armor room (usually controlling the yellow armor/rocket launcher) tends to setup to defend early. The reason for this is that they will tend to have rocket launchers which are more effective in an ambush situation where they can pin their opponents in the hallways which lead into the quad area. Remember these are only general rules and teams can and will diverge from this strategy as they see fit, however, by reading this a spectator will see when such a departure from the norm occurs. ConclusionSo now that we know that teams control the red armor room for the rail and for the armor protection players need to get a good quad run, what is the other team doing? They are being forced to regroup in the only remaining spots on the map which are the yellow armor and rocket launcher rooms. As seen below both of these rooms are adjacent to one another and allow the "down" team a chance to recover with weapons and armor. 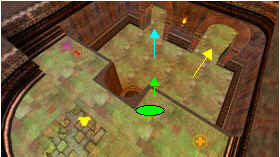
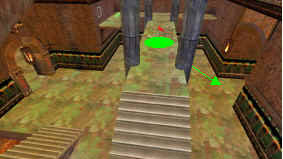
On the yellow armor graphic (above left), the light blue arrow points to the doorway that leads to the quad, the yellow arrow points towards the entrance to the rocket launcher. On the rocket launcher graphic (above right), the green arrow (also indicating where a defender will fire towards) is pointing towards the exit that leads to the red armor area. The door on the left in the rocket launcher room leads to the yellow armor area. Since these rooms are very easy to defend, the team that is losing will generally gravitate towards this area of the map. Here, they will then stock up on the few weapons open to them (rocket launcher, shotgun) and make the best out of the armor that is available. The yellow armor is only half of what the red armor is, so to get a player the same equivalent protection as someone in the red armor room a player will have to wait for two armors to appear. Each armor will appear 25 seconds after it is picked up and a team will have to decide on whether to get a few players a lot of armor, or have all the players with a little armor. One would think that having twice the armor in the red armor room would be a huge advantage, well it is an advantage but there is a little feature in quake3 that levels the field just a bit, and that is "armor rot". When a player picks up his first red armor, his armor is at 100....should he pick up another red armor it will go to 200, but it will slowly tick down (hence rot) to 100 again. So, a team that controls the red armor does get twice the amount of protection, but roughly 40 percent of that protection is wasted due to just armor rot. This is why it is important to pay attention to teams with armor management, is it being wasted or is the weaker player getting the armor? The end effect is that in order for any armor rot to occur with yellow armor (worth 50), three have to be picked up, whereas only two red will cause armor rot. The team at the rocket launcher area now has two choices: attack the quad area, or attack the red armor room. When they do it and how they do it is what is going to determine who gets control of the red armor room for the next few minutes. String together enough successful counter attacks from the rocket launcher room, and even though this team may not control the big items, the match will still be fairly close. Thus ends the "Spectators guide to DM7". Even though I did not go through exact strategies and timings that teams use, I hope now one can better understand the level that every team has to play and can better enjoy a game while watching through qtv/gtv or over someone's shoulder.
|